Typography / Task 1 Exercises
23/9/2024 – 28/10/2024 (Week 1 – Week 6)
Valerius Ethan Wirawan / 0372774
Typography / Creative Media / School of Design
Task 1: Exercises.
TABLE OF CONTENT
1. Lectures
2. Instructions
3. Process Work and Feedback
4. Final Outcome
5. Feedback
6. Reflection
7. Further Reading
1. LECTURES
1.1. Lecture 1 (Typo_0_Introduction)
- Typography: The art and technique of arranging type, making written language legible, readable and appealing when displayed.
- Font: Individual font/weight within typeface, examples are Georgia Regular, Georgia Italic, and Georgia Bold
- Typeface: The entire family of fonts/weights that share similar characteristics/styles examples are Georgia, Arial, Courier.
1.2 Lecture 2 (Typo_1_Development)
- Phoenicians write from right to left.

Fig. 1.2.1 Phoenicians Writting

Fig. 1.2.2 Development of Writtings
- Greek writes in a style called boustrophedon (means: how the ox ploughs), which is alternately from right to left and respectitively left to right.

Fig 1.2.3 Greek Writting
- Etruscan (and then Roman) painted letterforms before carving, which influenced their stroke qualities.

Fig. 1.2.4 Development of Phonecian Into Roman Letterforms

Fig. 1.2.5 Typography Development Timeline
Uppercase forms are essentially just a simple combination of straight lines and segments of circles because of the materials used. Phoenicians wrote in left-to-right direction. The Greek writer used a boustrophedon writing style, writing first from left to right and then right to left. As they painted, Etruscan carvers gradually created specific strokes that became known as serifs. Roman letters evolved from Phoenician and Greek letters over a period of around 900 years. Slanted tools were used to create square capitals, which had thick and thin strokes. Square capitals are condensed into rustic capitals. They were harder to read even though they were shorter and required less room to write. Writing quickly led to the eventual formation of lowercase letterforms. Uncials are "small letters" that combine characteristics of capital and lowercase characters. The first official introduction of lowercase letters were half-uncials. Under Charlemagne's direction, punctuation, capitalization, and uppercase and lowercase letters were adopted to standardize text. Communication was made clearer as a result.
Later, as a result of the various settings, tools, skills, cultures, etc. in different parts of Europe, distinct versions of the script emerged.
Fig. 1.2.6 Text Type Classification
- 1450 Blackletter: The first printing type, inspired by the handwriting styles used in northern European books of that era.
- 1475 Oldstyle: Derived from lowercase forms favored by Italian humanist scholars for book copying and uppercase letterforms seen on Roman inscriptions.
- 1500 Italic: A condensed, closely set type (now not regarded as a separate typeface).
- 1550 Script: Designed to mimic engraved calligraphic styles.
- 1750 Transitional: A refinement of Oldstyle, with exaggerated thick-thin contrasts and lighter brackets.
- 1775 Modern: Characterized by unbracketed serifs and a dramatic contrast between thick and thin strokes.
- 1825 Square Serif / Slab Serif: Features unbracketed serifs with minimal variation between thick and thin strokes.
- 1900 Sans Serif: Completely omits serifs.
- 1990 Serif / Sans Serif: Incorporates both serif and sans serif letterforms.
1.3 Lecture 3 (Typo_3_Text_P1)
- Kerning: Automatic adjustment of letterspace between individual letterform, kerning is different with spacing.

Fig. 1.3.1. Kerning
- Letterspacing: Space added between the letters.
- Tracking: Adjustment of space in a word or sentence. normal tracking, loose tracking & tight tracking.
Fig. 1.3.2. Tracking
Text readability is affected by tracking; if tracking is not done properly on lowercase forms, the text will be difficult to read. For uppercase forms, loose tracking works well, in contrast to the tendency for them to stand alone.
Text Formating: Flush right, flush left, centered, justified.


 Fig. 1.4.3. Standard Identation (Left) and Extended Identation (Right)

 Fig. 1.4.5. A Head (larger point size, small caps, bold, extended to left)


Punctuation and Miscellaneous Characters: These can vary between different typefaces, it's important to choose the right one. 
Ornaments: Decorative elements used to enhance invitations and certificates.

Roman: A style based on the uppercase letters found in Roman monuments. Book: A lighter version of the Roman style. Italic: Inspired by Italian handwriting from the 15th century. Oblique: A slanted version of the Roman typeface. Boldface: A thicker version than the Roman style. Semibold, Medium, Poster, Black: Various levels of thickness, with "semibold" being slightly thicker than regular, "medium" a bit thicker, "poster" for large text, and "black" being very thick. Light: A lighter version compared to the Roman style. Thin: An even lighter style than light. Condensed: A narrower version of the Roman style. Compressed: An extremely narrow style. Extended: A wider version of the Roman style.
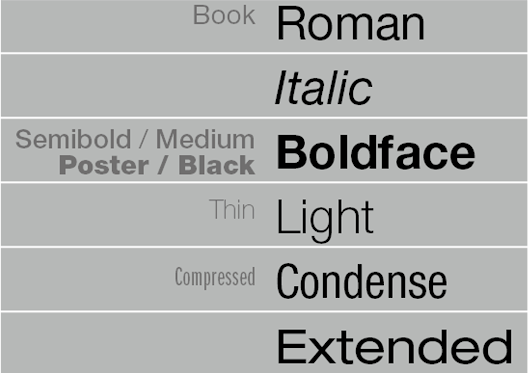

Fig. 1.5.9. 10 Typefaces Used in the Module

Fig. 1.3.3. Anatomy of a Typeface
- Texture: Various messages work best with different typefaces, typographer will choose which is best. Text with a large x-height or heavy stroke width creates a darker mass than smaller x-height or lighter stroke, it creates contrast of text.
- Leading: Space between baseline
- Line lenght: Should be 55-60 character to ensure reading comfort.
- Type Specimen Book: Examples of typefaces in various different sizes, to show reference for type size, type leading, type line.

Fig. 1.3.4 Type Speciment Book
1.4 Lecture 4 (Typo_4_Part_2)
- Pilcrow (symbol: ¶ ): Medievel manuscript mark of a paragraph, used until today.

Fig. 1.4.1. Pilcrow in Series of Text.
- Line Space and Leadings: Line space is the space from the baseline of a sentence to the descender of other sentence. Leading is the space between two sentences. Both ensures the cross allignment.

Fig. 1.4.2. Line Space and Leadings
- Indentation: Used to indicate paragraph, originally invented to save space in newspapers. The ident is the same size of the line spacing or the same as the point size of the text and best use when the text is justify.

- Widow: Series of words left alone at the end of column.
- Orphan: Short line of type left alone before a new column. These two seperated text should be avoided.

Fig. 1.4.4. Widow and Orphan
- Highlighting text: Bold, italic, colour, changing the type family, placing field colors, typography elements (bulleted list, number list, etc), "using quotation marks".
- Headline between text: A head (breaks within topics), B head (minor of A head) , C head (highlights specific facets of material within B head text, followed by empty space).


Fig. 1.4.6. B Head (bold serif, bold sans serif, small caps, italic)

Fig. 1.4.6. C Head (bold serif, bold sans serif, small caps, italic)
- Cross Allignment: The aligned text and visual elements across different columns or sections of a layout to create a cohesive and organized appearance.

Fig. 1.4.7. Example of Cross Allignment
1.5 Lecture 5 (Typo_2_Basic; Task 1)
Typography has evolved over 500 years and employs specific technical terms to describe letter forms .
Basic Terminologies (Illustration can be seen on Fig. 1.3.3. Anatomy of a Typeface)
- Baseline: The imaginary line that defines the visual base of letter forms.
- Median Line: The line defining the x-height of letter forms.
- X-Height: The height of lowercase letters, specifically the lowercase 'x'.
- Cap Height: The height of capital letters.
- Ascender Height: The height of strokes that extend above the median line.
- Descender Height: The part of a letter that extends below the baseline.
Letter Form Components
- Stroke: Any line that defines a letter form.
- Apex and Vertex: The points where two diagonal strokes meet; apex is at the top of 'A', vertex is at the bottom of 'V'.
- Arm: Short strokes off the stem of a letter.
- Crotch: The interior space where two strokes meet.
- Barb: A small decorative end on a curved stroke.
- Beak: A small decorative end on horizontal parts of letters.
- Bowl: The rounded part that creates an open space inside a letter.
- Bracket: The curved area where a serif connects to the main stroke of a letter.
- Cross Bar: The horizontal line that connects two vertical parts of a letter.
- Cross Stroke: Another name for the horizontal line connecting two vertical parts.
- Ear: A small extension from the main body of a letter.
- Finial: The rounded end of a stroke without a serif.
- Leg: A short stroke that extends from the main part of a letter (like the bottom of "L" or the downward part of "K" and "R").
- Ligature: A special character formed by combining two or more letters.
- Link: The part that connects the bowl and loop of a lowercase "g."
- Loop: The round part of a lowercase "g" that hangs down.
- Serif: The small decorative foot at the end of a stroke.
- Shoulder: The curved part of a letter that isn't a bowl.
- Spine: The curved main part of the letter "S."
- Spur: The small extension where a curved stroke meets a straight stroke.
- Stem: The main vertical or slanted stroke of a letter.
- Stress: The direction of the letter's thick and thin parts.
- Swash: A decorative flourish that extends a letter's stroke.
- Tail: The curved line at the end of some letters.
- Terminal: The end of a stroke that doesn’t have a serif; it can have different shapes, like rounded or flat.

Fig. 1.5.1. Letter Forms Component (from Mr. Vinods lecture, edited by Lim Ru Ying)
Spacing and Measurement
- M Space (Em): The width of an uppercase 'M', often used to describe space between words.
- N Space (En): Half the width of an 'M', used similarly.
Numerals in Typography
- Uppercase Numerals: Same height as uppercase letters, used in tabular material.

Fig. 1.5.2. Uppercase Numerals
- Lowercase Numerals: Set to x-height with ascenders and descenders, best used with text.

Fig. 1.5.3. Lowercase Numerals
Typeface Families
A type family includes various typefaces (bold, regular, etc.).
- Small Capitals found in serif fonts, used to maintain visual harmony in text.

Fig. 1.5.4. Small Capital (above)
Good typography balances readability and expression, reflecting the era of its design. Designers often use a limited palette of typefaces to maintain consistency.
- Italic: This style comes from Italian cursive writing from the 15th century.

Fig. 1.5.5. Italic

Fig. 1.5.6. Punctuation, etc. Characters

Fig. 1.5.7. Ornaments

Fig. 1.5.8. Difference of Typefaces
Comparing Typefaces
This module featured 10 typefaces that showcased 500 years of type design. Understanding the emotions that each typeface produces will help your work effectively communicate its intended message.

Fig. 1.5.9. 10 Typefaces Used in the Module
2. INSTRUCTIONS
Fig. 2.1. Module Information Booklet (MIB)
<iframe src="https://drive.google.com/file/d/1AGMyR5Vb9HUnShtmaNkDtAF7ycpKB7HO/preview" width="640" height="480" allow="autoplay"></iframe>
3. PROCESS WORK AND FEEDBACK
Task 1: Exercise 1 - Type Expression
Using the ten fonts the professor provided, create designs for the four words jump, chop, fish, and shake. In advance, sketches are created.

Fig. 3.1. Type Expression Brainstorming Sketches (24/09/2024)
-300ppi.jpg)
Fig. 3.2. Type Expression Sketches (01/10/2024)
I received some feedback regarding the designs. First of all, I was advised to simplify some of the drawings because they are excessively complicated (fish). Second, in addition to readability, the design should imply more expression.

Fig. 3.3. Type Expression Progress (08/10/2024)
After some consulting with Ms. Vitiyaa, she said that my work need to stand out from all the typography student. So, i decided to use these (Fig. 3.4. Type Expression) designs as my final (unanimated) type expression artwork.
.jpg)
Fig. 3.4. Type Expression (JPEG - 08/10/2024)
According to Ms. Vitiyaa (Week 4), we received input from Mr. Vinod, our primary lecturer, on not distorting too much. Thus, certain designs are updated one more. The final design that is submitted is on the 'Final Outcome' part of this e-portfolio (Fig. 4.1. Final Outcome of Type Expression).
Task 1: Exercise 2 - Text Formatting
The task is to use text formatting adjustments such as kerning and tracking by our names using InDesign software. Mr. Vinod gave the tutorial on the Teams.

Fig. 3.5. Exercise Tutorial and Text Formatting Exercise (14/10/2024)
Fig. 3.6. Task 1 Exercise 2 With (Left), Without (Right) Kerning and Tracking (14/10/2024)
Fig. 3.7. Task 1 Exercise 2 Overlapped Before and After Kerning and Tracking (14/10/2024)
The instruction for text formatting task :
- Font size (8–12)
- Line Length (55–65/50–60 characters)
- Text Leading (2, 2.5, 3 points larger than font size)
- Paragraph spacing (follows the leading)
- Ragging (left alignment) / Rivers (Left Justification)
- Cross Alignment
- No Widows / Orphans

Fig. 3.8. Task 1 Exercise 2 Text Formatting Process (16/10/2024)

Fig. 3.9. Task 1 Exercise 2 Text Formatting (16/10/2024)
The task is done, but I have done some mistakes such as not paying attention on the instruction especially 'Text Leading (2, 2.5, 3 points larger than font size)'. So, I revised it again to use leading 2/2.5/3 pt more than font size.

Fig. 3.10. Task 1 Exercise 2 Text Formatting Revised (21/10/2024)
After some consultation with Ms. Vitiyaa, I relized that my text layout isn't applying the golden ratio. Due to it, I revised it again to allign golden ratio, some adjustment of kernings are also done better.

Fig. 3.10. Task 1 Exercise 2 Text Formatting 2nd Revised (21/10/2024)
MAJOR HEADLINE
Typeface: Bembo Std
Font/s: Bembo Std Bold
Type Size/s: 91 pt
Leading: 110 pt
Paragraph spacing: 0
Typeface: Bembo Std
Font/s: Bembo Std Bold
Type Size/s: 91 pt
Leading: 110 pt
Paragraph spacing: 0
HEADLINE 'I am'
Typeface: Bembo Std
Font/s: Bembo Std Sembiold
Type Size/s: 72 pt
Leading: 75 pt
Paragraph spacing: 0
Typeface: Bembo Std
Font/s: Bembo Std Sembiold
Type Size/s: 72 pt
Leading: 75 pt
Paragraph spacing: 0
SUBHEADLINE 'by John Doe'
Typeface: Bembo Std
Font/s: Bembo Std Sembiold Italic
Type Size/s: 24 pt
Leading: 27 pt
Paragraph spacing: 0
Typeface: Bembo Std
Font/s: Bembo Std Sembiold Italic
Type Size/s: 24 pt
Leading: 27 pt
Paragraph spacing: 0
BODY
Typeface: Bembo Std
Font/s: Bembo Regular
Type Size/s: 10 pt
Leading: 12 pt
Paragraph spacing: 12 pt
Characters per-line: 50-60
Alignment: Left Justified
Margins: 29.63 mm top, 12.7 mm left + right, 21,167 mm bottom
Columns: 2
Gutter: 12,7 mm
4. FINAL OUTCOME
Task 1: Exercises - Type Expression
.jpg)
Fig. 4.1. Final Outcome of Type Expression (JPEG - 15/10/2024)
<iframe src="https://drive.google.com/file/d/18INrHFWfdepIly9RaMgZPoasm92BzCce/preview" width="640" height="480" allow="autoplay"></iframe>
Fig 4.2. Final Outcome of Type expression (PDF - 15/10/2024)
.gif)
Fig. 4.3. 'Fish' Final Outcome - Type Expression (GIF - 15/10/2024)

Fig. 4.4. Task 1 Exercise 2 - Text Formatting (JPEG - 21/10/2024)
Fig 4.5. Task 1 Exercise 2 - Text Formatting - Without Grids (PDF - 21/10/2024)
Fig 4.6. Task 1 Exercise 2 - Text Formatting - With Grids (PDF - 21/10/2024)
5. FEEDBACK
Week 6
General Feedback: Ms. Vitiyaa said that the 'Helvetica' text should be revised regarding it isnt proporsional. The text should be printed, I have printed it.
Week 5
General Feedback: Organize the e-portfolio in terms of font size, make images in one frame (one figure). Process pictures needed: first sketches, digitasation, final outcome. Make a reflection (3 parts) section and further reading. I need to do assignments into te maximum step i can do, don't wait until you are sure, the e-portfoilio is for showing process.
Specific Feedback: The 'Helvetica' text should be using the golden ratio. Ms. Vitiyaa explained i should use the golden ratio with the spiral end (more circular shapes end) in the bottom left. An other idea is to flip the pigeon image and put it on the left facing right, but the idea will take a lot of time to edit ot again. So i was suggested to just use the first idea.
Specific Feedback: The kerning exercise should have one with kerning and one without. Further readings should ude 2 books.
Week 4
General Feedback: In the on-site class, we are encouraged to make designs with minimum changes (simple but impactfull). Some of my type expression designs are too distorted, said Ms. Vitiyaa. Specific Feedback: The 'Jump' has been revised without the arrow. The 'fish' revised become more simple withouth distortion at all, the design for fish is too complicated so I simplify the fishing line and the fish using it's own letterforms.(Fig. 3.4. Type Expression) Week 3
General Feedback: I have brainstorm all my ideas in my sketcbook (Fig. 3.1. Type Expression Brainstorming Sketches), I received inspirations from pinterest and other online platform. From the manual sketches i continue to digital sketches. In the on-site class I'm just finalizing it. (Fig. 3.2. Type Expression Sketches)
Specific Feedback: Some of the design are too complex, such as 'chop' should just use one font. I have revised it to use just a font.
Week 2
General Feedback: I learned how to make the blog (e-portfolio), haven't done perfectly. It is the first class and I'm still unsure with how to layout the blog correctly. I have done to watch the lecture.
General Feedback: The pre-recorded lecture have been watched and summarized. I have updated the blog until text type classification (Fig. 1.2.6 Text Type Classification)
Week 1General Feedback: I learned how to make the blog (e-portfolio), haven't done perfectly. It is the first class and I'm still unsure with how to layout the blog correctly. I have done to watch the lecture.
6. REFLECTION
Experience
I've been taking this class for five weeks, and it requires a lot of focus and attention. I began working on homework and exercises. Initially, it was challenging to properly manage and comprehend the instruction, but I gained a lot of knowledge from doing so. I attend class each week to follow the instructions exactly and to seek Ms. Vitiyaa for any comments or suggestions on my work. Ms. Vitiyaa makes sure that everyone completes the assignments by the due date and according to the instructions given by Mr. Vinod, the module lecturer. We also view the lectures that have been pre-recorded and compile the information into our e-portfolio website.
Observations
I've been able to work more quickly, and weekly tasks provide me with experience and criticism that will help me improve my work. I had been ignoring some instructions that needed to be completed, but this taught me to pay closer attention to instructions. I struggle with working with Adobe software because I'm not very familiar with it, but I was able to get assistance from friends, Ms. Vitiyaa, and the internet.
Findings
The interesting field of typography blends communication and art. It includes the visual impression that words and letters produce in addition to their arrangement. My awareness of the typefaces and layouts around me has increased as a result of working with typography, which has improved my enjoyment of the small elements in daily life.
Another thing I can do better is time management. I've observed that I frequently take too long to do tasks for different modules. Effective task prioritization and avoiding the perfectionism trap, which may block my progress.
I had previously ignored the technical aspects of typography, but learning about it has made me more aware of them. My ability to express myself creatively and create better work will get better if I understand module. This journey gained greatly from feedbacks, that encourages a growth attitude of doing the best.
7. FURTHER READING

7. FURTHER READING
An Essay on Typography by Eric Gill

Fig. 7.1. 'An Essay on Typography' by Eric Gill; introduction by Christpher S. (left); original cover (right)
Eric Gill's 'An Essay on Typography' was first published in 1931 and the second edition in 1936. The book discusses typography's industrialized evolution, it highlights the need for craftsmanship (artisanal work) in this age of mechanical machines. I had been reading the typography section on the book (page 59-74). The part highlights the nature of modern industrialism, typography's role, importance of historical context, and artistic responsibility. According to Gill nowdays industries has change human work in creativity and craftmanship. Industrial methods has dominate production process making workers lose their artistic identity and contribution to the machine base production. Due to the way of nowadays artworks production artists may experience pride-lost on creating artworks. Typography should not just used on functional writing purposes but must also create artistic integrity. The larger trend in industrial production the more decline of craftsmanship in typography will be, where a lot of aesthetic curves and designs are often cut-out for efficiency and uniformity. Typography must be understand from the historical and cultural concepts. England's transition from an agricultural society to an industrial one affects how typography is used in society. Remnants (such as handcrafted signage, letterpress printing, artisan bookbinding, calligraphy, etc.) of pre-industrial craftsmanship still exist but it is seen as relics rather than a components of modern design. Gill suggest to bring back the era of responsible craftsmanship in typography, where designers have intellectual copyright of their work's. He believes everyone contributing to creative work should be doing it passionately and take pride to create artistic and meaningful works.


Comments
Post a Comment